Day of Giving: Using Salesforce to send multiple reminders with a few clicks!
Pittsburgh Magazine’s “Give Big Pittsburgh” event is almost here! If you are unfamiliar with this fantastic day of giving, it is a 24-hour online fundraising effort hosted by Pittsburgh Magazine and other local sponsors that offers local non-profits a chance to raise funds for their most important causes through a single online donation platform. The countdown until #GivingTuesday is here and there are only about 60 days to go before the event goes live, so make sure you are registered as soon as possible to make the most of this fantastic opportunity at https://www.givebigpittsburgh.com/register. If you do not see your organization appear in the search function, you can always add it manually by clicking the “Add My Organization” button at the bottom of the search results.

Give Big Pittsburgh
To learn more about Give Big Pittsburgh, eligibility and the dispensation of funds from the GiveGab fundraising platform, please visit their FAQ page at https://www.givebigpittsburgh.com/info/faq.
Now that you know about this fabulous opportunity (or remember it’s already that time of year again), let’s turn our attention towards how Salesforce can help you send a reminder to all of your favorite donors that “Winter is Coming!” Just kidding, kind of, not really. The season of cold merriment is certainly on its way, that’s for sure, but I am sure that you are now focused more on messages of gratitude and giving back to local communities as the season turns and we say goodbye to summer weather. In just a few clicks, you can easily send out a batch email reminder a la Salesforce to remind your happy donors that there is an easy way for them to share some joy this holiday season. Let’s dive into how you can use Salesforce List Views to send the same email to multiple leads or contacts!
Go into your org and click on either the Contacts or Lead tab on your home page navigation bar to access a list view of records for either object.
Salesforce Navigation Bar
Please note that you will not be able to change or add filters to a global list view if you do not have the appropriate access permissions. Whether you have access or not, best practice is to clone a list view that you will use more than once before making your changes so you do not affect any other users. You can do this by choosing the list view you would like to use as your base, then press the gear icon on the right side to reach the dropdown menu with the “Clone” option.
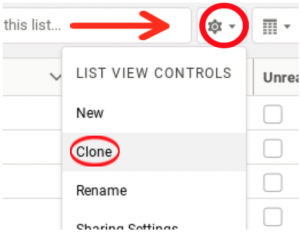
Clone Salesforce List View
Once you have created your new, personal list view, decide upon the parameters you would like to filter your list by, perhaps annual income/revenue, state or industry. Apply them by clicking the filter icon on the far right and choosing your boundaries from the dropdown menu. Click on “Add Filter” for each parameter. If you choose to filter by a field such as state, make sure that you have a naming convention if you set the operator to “equals” to ensure that you do not miss any desired records that may be under a different variation. For example, I may want to set the filter to “contains” and list the values as “PA, Pennsylvania, p.a.” if there is no standard field format.
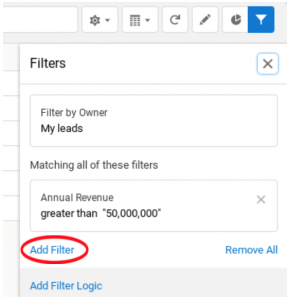
Add Filter to Salesforce List View
After you have filtered your list down to the desired recipients of your email blast, click the checkbox to the left of the “Name” column header to select all records on the list at once.
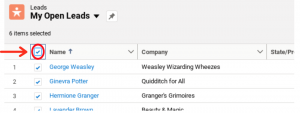
Select Multiples on Salesforce List View
Then, click the “Send List Email” button on the right side, above your record list, to either write the email and insert merge fields as necessary or upload a premade template.
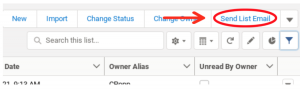
Send Email on Salesforce List
To upload a template, click on the middle symbol on the bottom left of the “Send List Email” popup. If you would like to create a template for current and future use, you can do so by writing your email and then saving it as a template with the same button. By clicking on the arrow next to the blue “Send” button in the bottom right corner, you can also choose to send out the email at a specific date and time in the future.
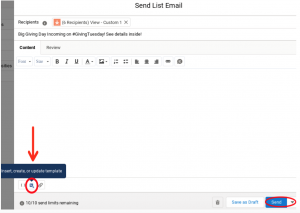
Create Salesforce Email Template
If you go to the “Review” tab to the right of “Content,” you can see all of the recipients tagged for your email to make sure that you aren’t missing an important future donor and also preview each message to ensure that the merge fields are working properly before you send them off.
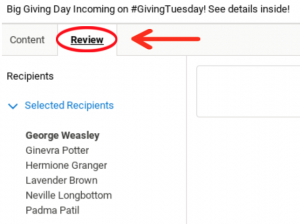
Review Salesforce List View Email
Once you have double-checked your recipient list and message, press the “Send” button. Please note that Salesforce does have send limits and you cannot send more than 5000 List View emails a day. As an additional feature that makes your life easier, Salesforce will send you an email after your message has been sent out to let you know if you had any hard or soft bounces. That way, you can instantly check to see if you have any invalid email addresses that you need to take out of your lead queue temporarily until you are able to update your data.
If you found this walkthrough a bit confusing, or would simply prefer a live demo, definitely check out one of our CAS Come and See videos on Youtube, guided by our very own President of Cloud Adoption Solutions, Shannon. Here you can watch her explain and show you step-by-step how you can use Salesforce to send the same email to multiple people.
There are also other options for keeping your donors (and employees) in the loop for big events. If you would like to hear more about this topic, or another that your organization would like to know more about, please let us know by commenting on our YouTube video or contacting us at https://cloudadoption.solutions.